Wongster's Production
Share it on
  • Home
  • Blog
  • My Old Blog
  • My Shop
  • Resources
  • About Me...
  • Contact Wongster

Portabee - Construction

10/6/2012

20 Comments

 
A day or two after I returned from my Bangkok trip, I received a message from Mike that the Portabee has arrived.  I popped over his shop with my little girl to pick it up.  I wasn't very excited about the 3D printer as I've yet to complete the ER32 Collet Chuck for the Proxxon lathe.  There are a few other projects I would like to work on before my leave ended.  But I couldn't stop the moment when I opened the unlabeled box...  It is addictive!!!

The construction of the printer was completed after 2 nights.  I did my first print this morning.  The result was crappy as the bed wasn't leveled relative to the spindle (or should I say extruder).  It was nonetheless a good experience.  A call to Mike provided the solution of how the bed should be leveled.  It took me quite some time to get it almost right and the next print came off okay.  More needs to be done in order to achieve the quality of printer shown by many out there into 3D printing.

I would like to take the opportunity to thank Mike of SG Tooling and KP of romscraj for their help in getting me going.  Both are very patient with this brainless newbie and responded to my whatsapp and emails even late into the night.

I also had the opportunity to tour KP's shop at Midview City on 18 Sin Ming Lane.  It is not too much of a shop but their production area.  Good stuff you have their, KP!
Picture
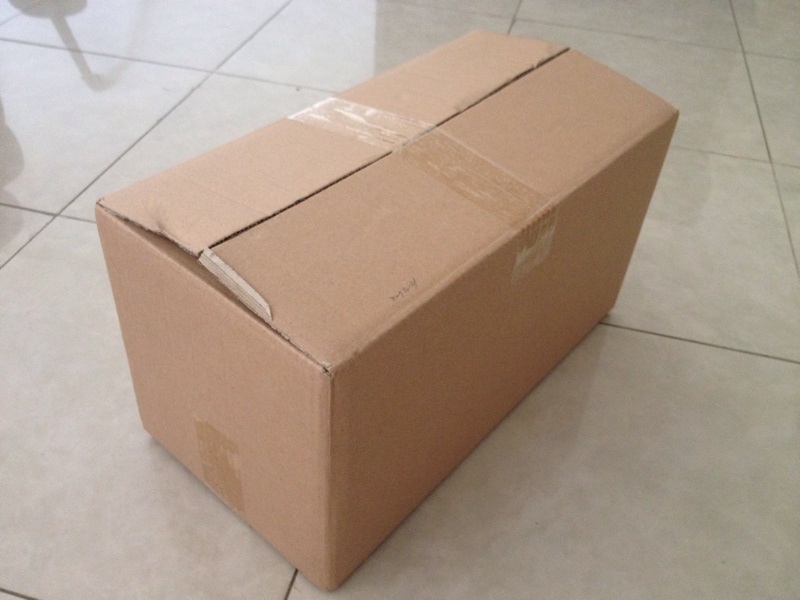
This is the box that houses the components of the kit. Nothing to shout about.
Picture
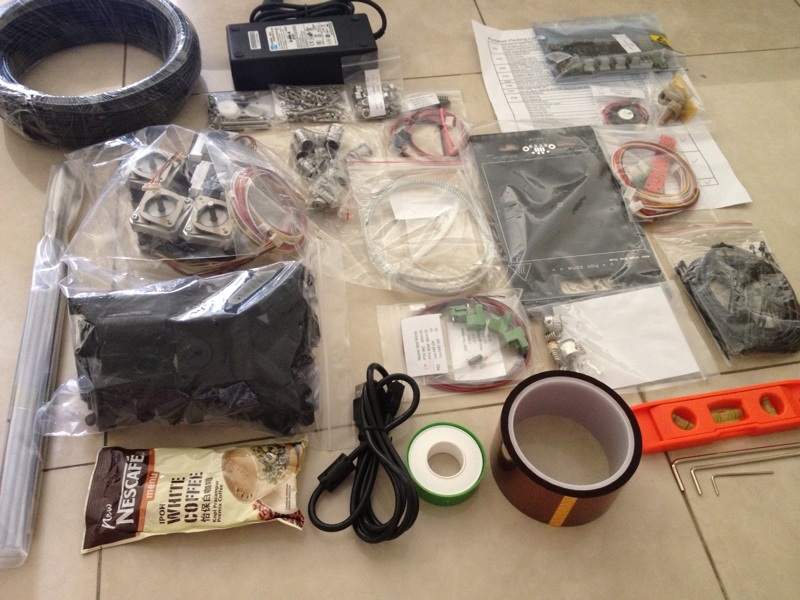
All the parts laid out. Yes, the pack of instant coffee is included as part of the kit. Taste good.
Picture
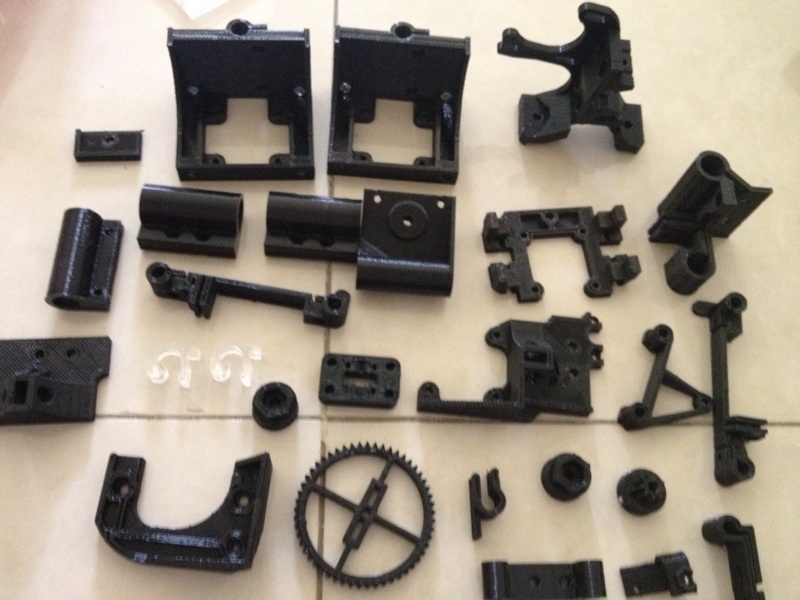
The printed parts. The quality of some of the parts are left lots to be desired. They're, however, usable.
Picture
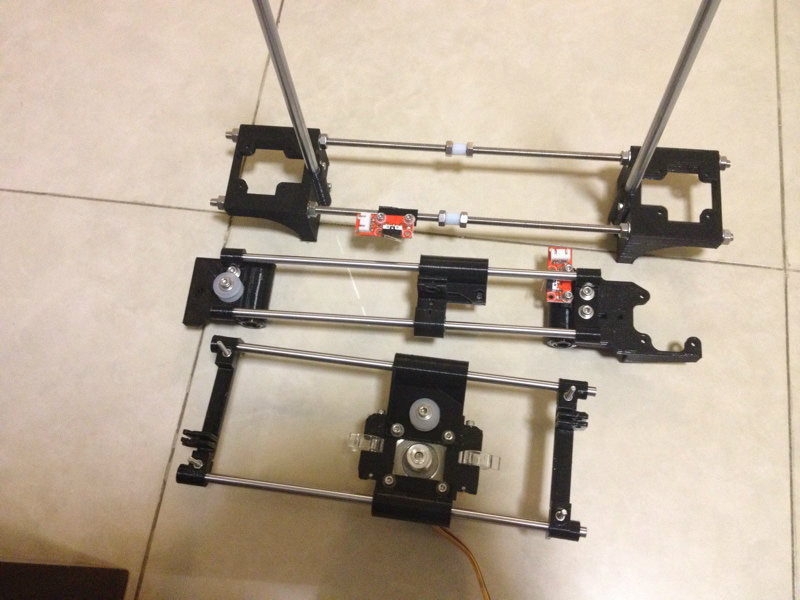
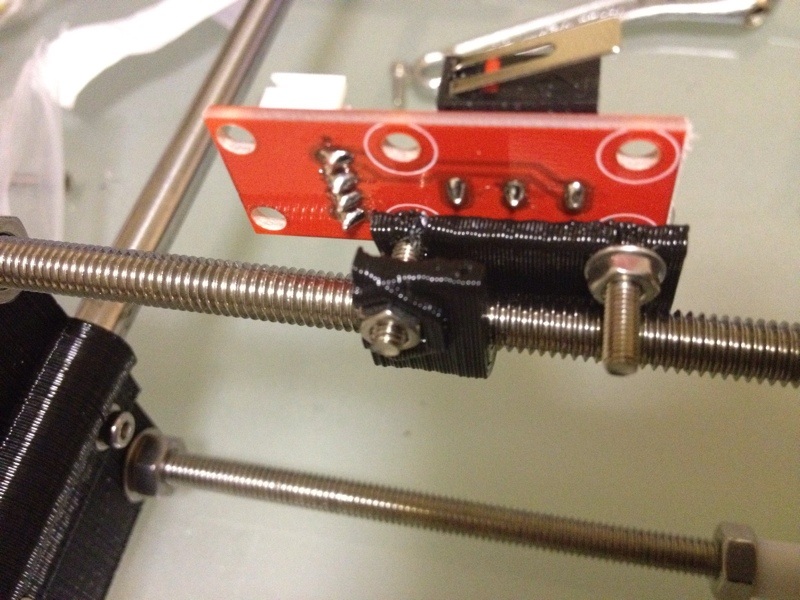
The frame of the 3 axes done. The little red PCBs are the limit switches used for homing.
Picture
One of the badly printed parts included in the kit. If I remember correctly, this is the clamp for the home switch.
Picture
Despite its defective look, it works as it should without problem.
Picture
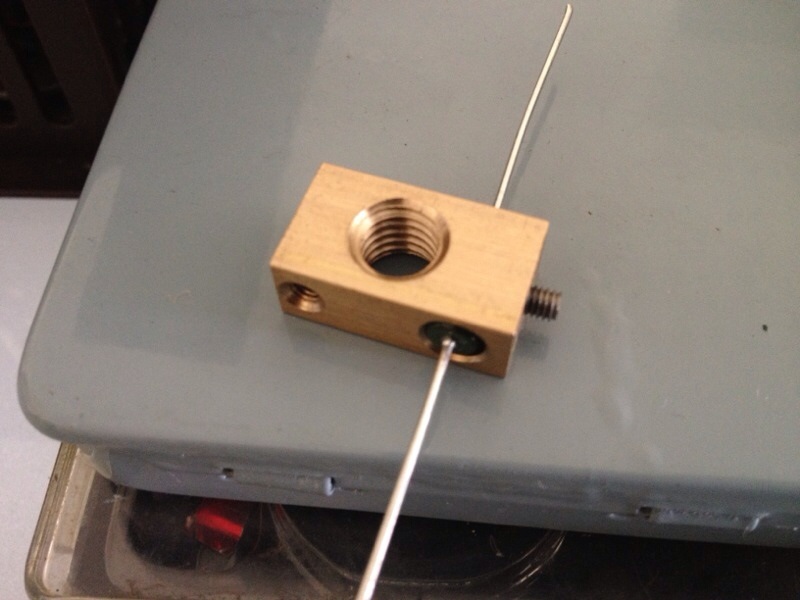
The brass block for the hot-end. The big resistor was wrapped with a couple layers of Kapton Tape before inserted into the hole. I believe the function of this resistor is to generate the heat to melt the plastic.
Picture
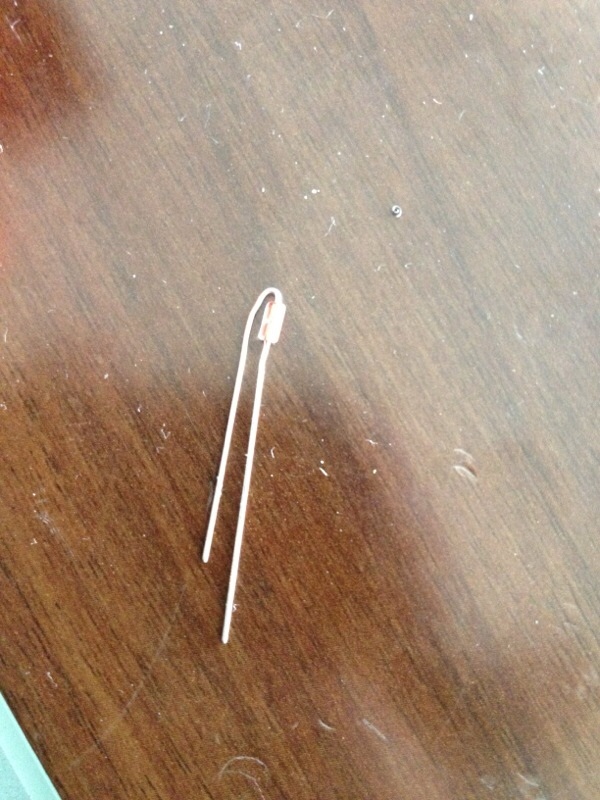
The Thermistor. This, I was told by KP, who is Mike's supplier, measures the temperature
Picture
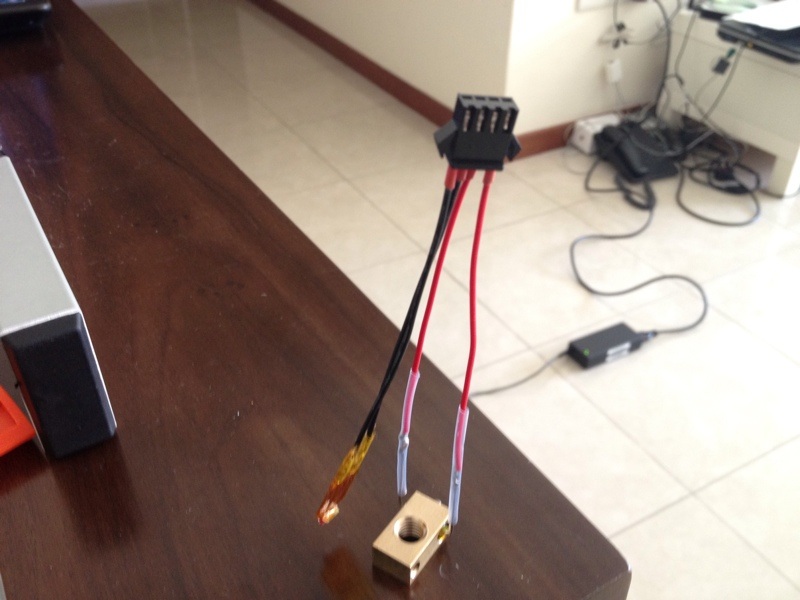
The Thermistor and Resistor soldered to their wires.
Picture
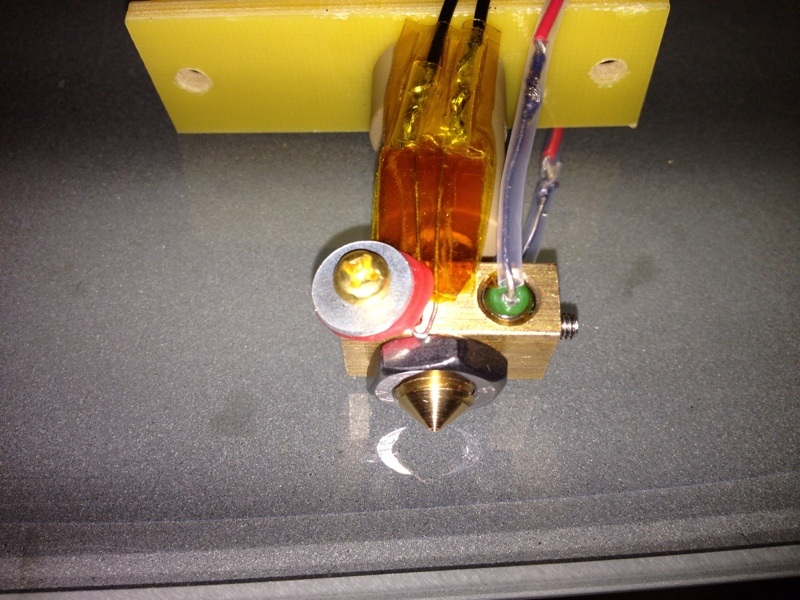
The hot-end done. Time to do the Extruder.
Picture
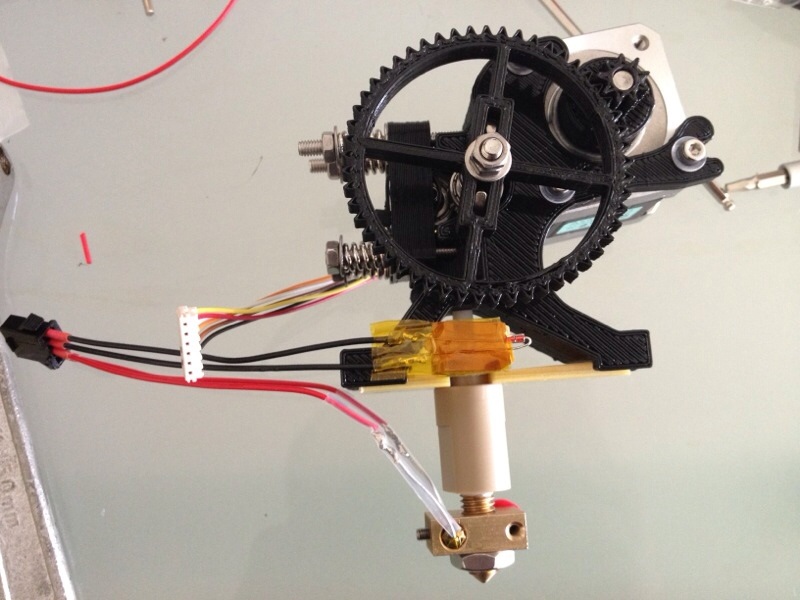
Extruder done. Just need to clamp down the Thermistor.
Picture
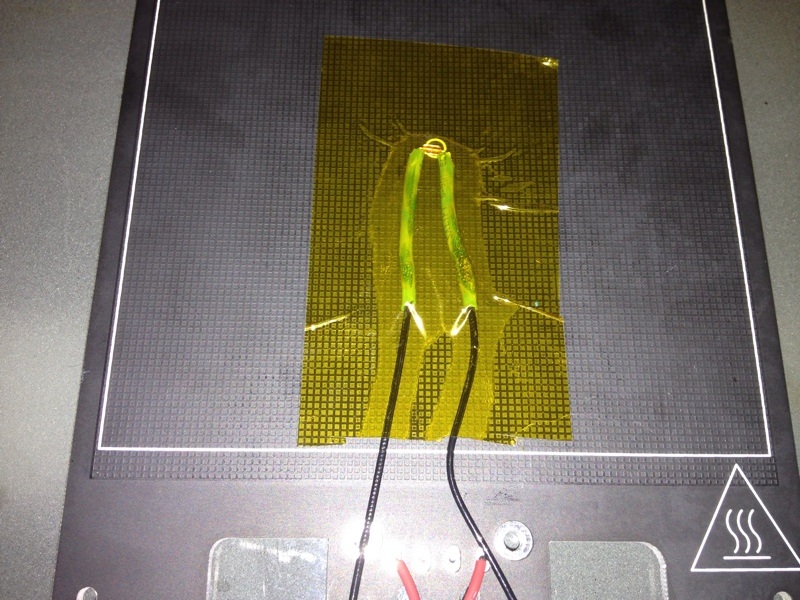
Sticking a Thermistor to the back of the bed.
Picture
Cork board pasted on.
Picture
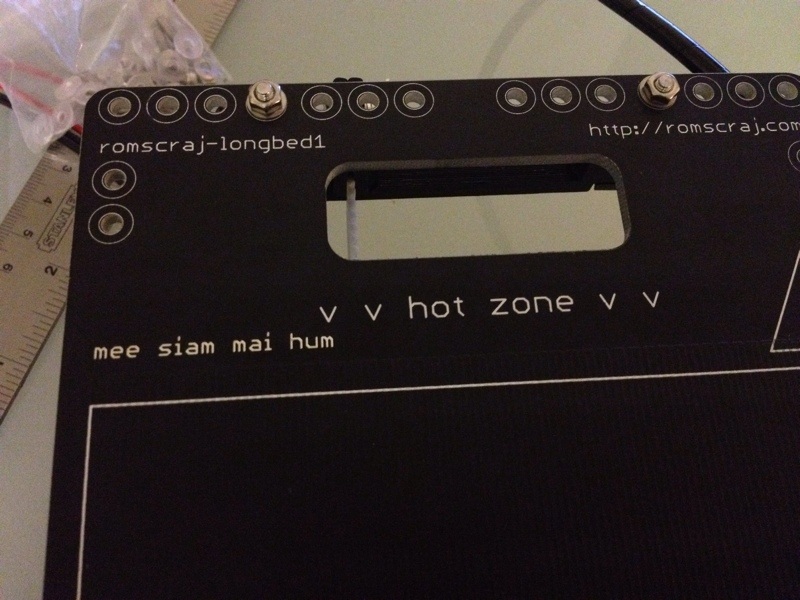
This is cute! Printed on the surface of the hot bed is the famous "mee siam mai hum"... lolz. You should read the manual - it is laced with humour.
Picture
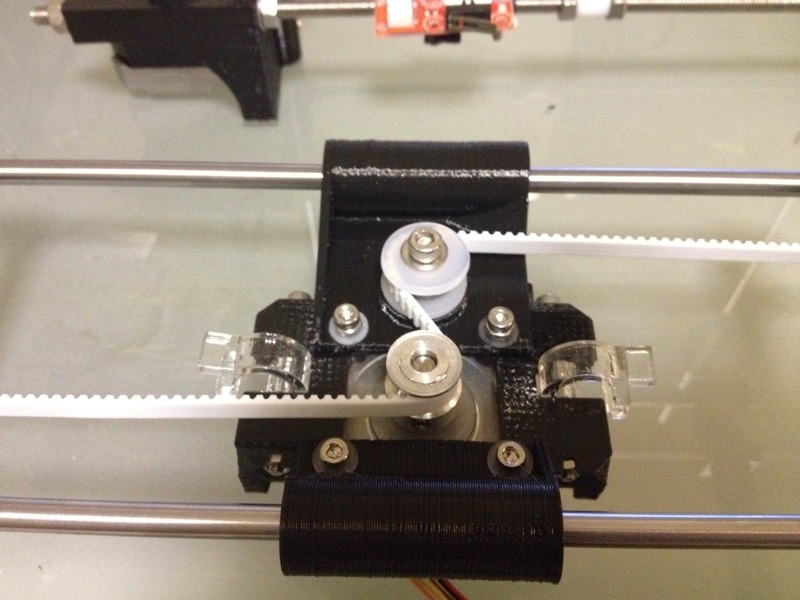
Putting on the belt.
Picture
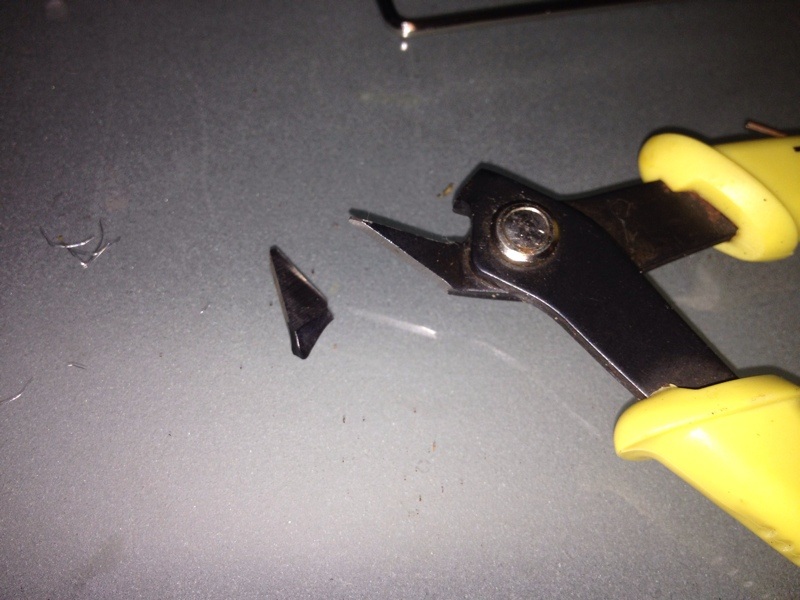
The 2 belts provided for X and Y axes have steel wires in them. The wasted cutter for my basic electronic work...
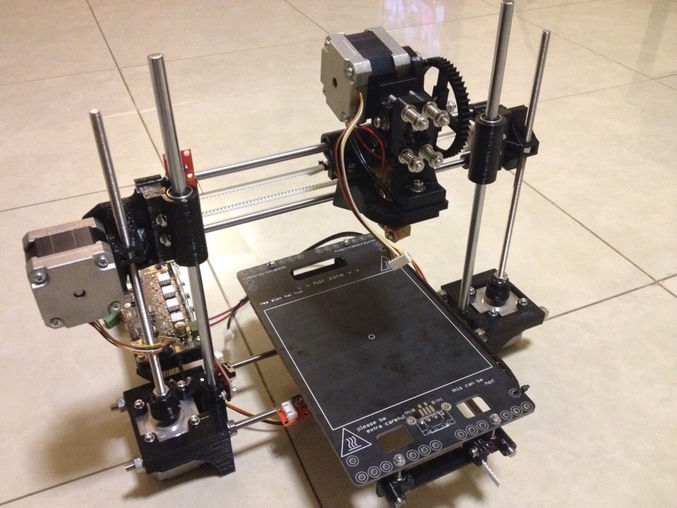
Picture
All assembled.
Picture
and wired up.
When I did a test run of the printer, X axis refused to move, making some noise.  After swapping the wires and motors to isolate the problem, I figured out that its the board that is giving the problem.  An email was sent to KP of Romscraj, he asked me to drop by his office at Sin Ming to let them check and suggested that I bring down the printer.  Boy I'm glad that I did that! I've never seen so many printers working at the same time and the shop is cool!!!  KP swapped the board for a new one and plugged in the wires to do a test print.  Except the lousy printout due to the bed not being level (yet), everything else works fine.

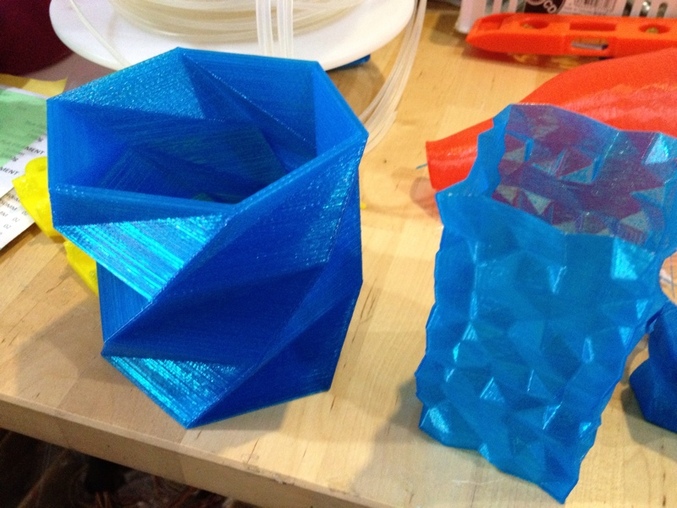
I saw these 2 vase in the shop and can't help but to take a pic of them.  Nice print!
Picture

When I got home, I did a trial print on my own.  Here's the clip:
Picture
Picture
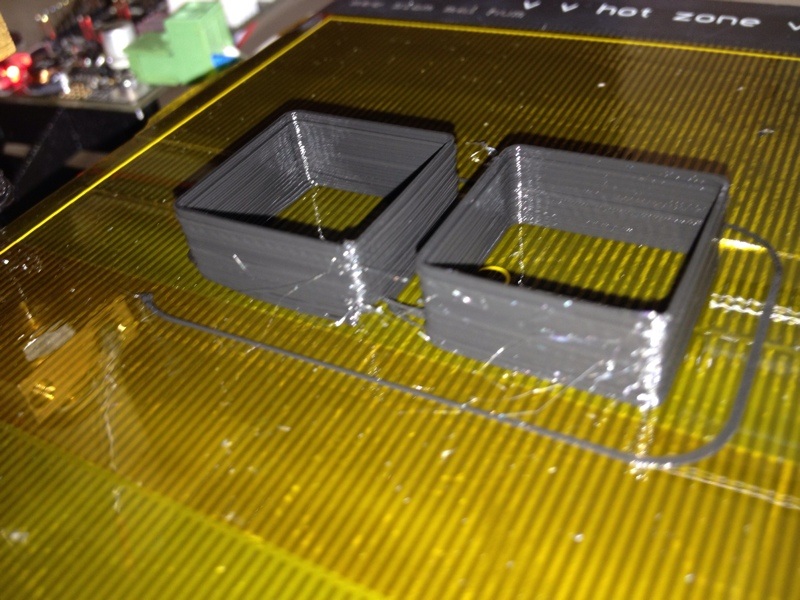
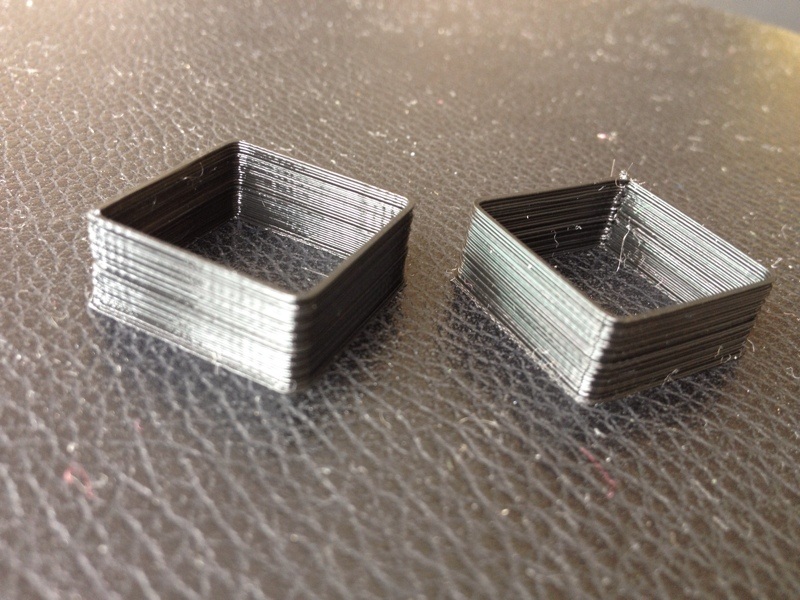
The above 2 pics were the results of my attempt to level the bed.  Not too bad but lots more to be done.  Compare these to my first print before leveling.
Picture
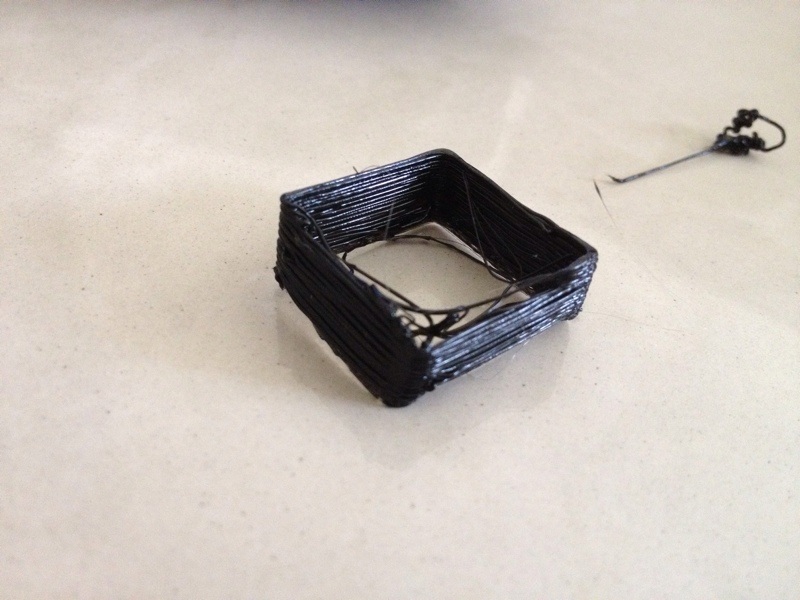
My very first print - crappy...
More work and more work needed to square up the printer's axes and to understand how to calibrate it to print correctly.  I wonder when I'll be back in my metal shop to finish up with the ER32 Collet Chuck and the rest on my To-Do list with this printer around...  So much to do, so little time...
20 Comments
Gene King
10/6/2012 09:54:48 pm

I seem to remember at their web site they had a 0.5 mm nozzle to improve the resolution. Of course this would increase the print time wouldn't it? That looks to be a very interesting and fun machine to play with.

GeneK

Reply
Loke-Yeow Wong
10/6/2012 11:27:58 pm

The nozzle that came with the kit is the 0.5mm nozzle. I was told that I need to square up the printer and make fine adjustments before it can deliver the finer result.

I'll tweak it as I move along. Fun to be able to just download/draw the parts and print. No worries about work holding... Lolz...

Wong

Reply
Gene King
11/6/2012 02:41:52 am

Well, that's good. I'm going to watch you carefully, I am interested but don't have the money right now. I may get some more disability money from the Veterans, if I do there will be a lump sum dating back to October last year. Might be enough to cover one of these machines.

GeneK

Reply
Loke-Yeow Wong
11/6/2012 04:04:50 am

What I can do is to print out the parts you need and send them over. You'll just need the threaded rods, smooth rods and bearings to make one. The bearings provided in the kit are the cheaper type. The expensive stuff likely to be the electronics. But I read of folks using Arduino or one of its variants. Since the kit cost USD480, the board should likely be under USD200? 4 stepper motors are needed.

This should cut down your cost of having one.

How does that sound to you?

Wong

Reply
Gene King
11/6/2012 04:35:55 am

Wong, could be a fun project. Just have to see if the money materializes. My wife is on a trip for about a month and half, so I'm trying to get things back in order to get back into my shop. And when my son moves out I'll have a lot more room in the garage. He moved in with us to go back to college and get his RN license and is now paying off the student loans.
I do think the 3D printer would be a blast to play with.
I'll keep looking at sources and see what I can put together.

GeneK

Reply
Loke-Yeow Wong
11/6/2012 05:19:14 am

Yes sir. It will be fun. Let's do this together. It won't cost me much to send you a bunch of plastic parts and use up some of the PLA. I've more than enough to spare.

Start by looking at reprap.org and thingiverse. There are some designs which you can consider. Mine is a very small printer, so try to keep each piece within 120mm x 120mm x 120mm (maybe slightly smaller than that). But from most I saw, that shouldn't be a problem.

Do bear in mind though I'm very new to this. So the printed parts may not be of quality you can expect from those more experience folks. If any parts gives problem, just let me know, I'll re-print them and ship it over.

Once you have it going, you can start customizing it with your own printed parts.

When do you want to start? I'm excited already!

Wong


Reply
Gene King
12/6/2012 05:58:57 am

Wong, I would be honored to have you help me work into this new area. I'm still working to get my head around all the ins and outs of the technology.
From my time in engineering I try to get the 'big picture' and I still have some gaps. Are you using BobCad for the g-code or some other program, does it use USB or parallel interface? This is the area that I'm the one taking baby steps.

GeneK

Reply
Loke-Yeow Wong
12/6/2012 08:37:08 am

GeneK,
My reply seems to disappear...

Anyway, I was writing about myself jumping in without doing much research or reading. We'll figure our way around with the help of forums and published articles online.

Mike (my supplier and friend) and I are going into this Printrbot. The bed looks more stable and it has the same foot print as the Portabee. You can check it out here: http://www.thingiverse.com/thing:16990.

I don't know to use BobCad to output the Gcode in the format and words required. I'm using this freeware printrun and slic3r. Quite easy to learn.

Using USB for the board. So another plus. It works with my notebook running Win7 64 bit.

Wong

Reply
Gene King
12/6/2012 11:53:10 pm

Wong, I think that BobCad can output the STL file for the other programs to use. Running on my laptop sounds attractive, I have ver. 24 to install on it.
I'll keep reading and try to understand what I'm getting into.

GeneK

Reply
Loke-Yeow Wong
13/6/2012 02:12:43 am

I'm still trying to figure out if it's possible to convert STL to something that I can manipulate with (eg changing hole size, dimensions etc). Still very bad at the software end, in fact, bad in all departments 😜

Wong

Reply
Gene King
13/6/2012 11:43:52 pm

Wong, so far it looks as if the STL to solid form is the missing link. All searches for such a beast end up as requests for one. Hoowever, BobCad will out put STL from solids that are loaded into it. That means we can create our own projects.
It would be neat to load and modify an existing STL.

GeneK

Reply
Isaac Cheng
2/7/2012 03:07:53 pm

I got the same kit from SGtooling recently.

My first print is similar to your, except mine is even worst. May I know how is the bed leveling done? Adjusting the 4 nuts on the y-end? I can't turn these nuts unless I take down the entire print bed.

Do you know where to download the firmware? From what I read online, the calibration adjustments have to be made in firmware configuration.h and uploaded to the board. I have no idea how to do this.

Reply
Loke-Yeow Wong
2/7/2012 03:44:09 pm

Hello Isaac,
Thanks for dropping the note.

The leveling is done via the nuts holding the bed; one on top and one below. The firmware adjustments you read are probably for calibrating the motors step per mm.

Bring the print head down at one corner of the bed such that you can feel friction when sliding a piece of printing paper underneath. One I have the first corner done, I'll adjust the z endstop such that the print head will home just about the paper thickness. I then move to the next corner and jog down till I'm either hit the endstop or almost hitting the bed. Then I'll adjust the nuts at that corner till I get the same dragging feel of the piece of paper between the nozzle and the bed. Repeat this at the other 2 corners.

I repeated the same procedure one more round (without adjusting the endstop) to make sure I get the same dragging feel. The centre is done last, but for this, I just adjust the endstop.

This was what Mike shared and also what I read in some blogs/forum.

I've recently trammed the printer but have yet to level the bed again. Out of the country now. Will do another test print once I get that done. But this may delay if I receive my new Wabeco mill on Wednesday.

Regards,
Wong

Reply
Isaac Cheng
2/7/2012 04:01:14 pm

Hi Wong,

Thank you for the detailed write-up. I'll try that.

Wonder if you have tried measuring the extruder calibration as mentioned in http://richrap.blogspot.sg/2012/01/slic3r-is-nicer-part-1-settings-and.html.

I tried measuring mine and results are way off. Supposed to have extruded 30mm but actual is only about 12 to 13mm. Tested 3 times and I get a different reading each time (faint).

Guess I am a long way off before I can print anything useful.

Reply
Loke-Yeow Wong
2/7/2012 04:15:21 pm

Yes sir. I did that. Extruded 5mm at a time. Measured correctly at the ballpark.

Go through the rest of the settings in slic3r (if you're using that) first. Check also the way the extruder is put together.

If still don't work, write or call Mike.

Regards,
Wong

Reply
Shannon
20/10/2012 03:47:52 pm

Hi Wong.

I've finally got my printer assembled (was waiting for them to ship a missing part) and have grabbed the Cura software but I can't find any buttons for running the fan (which they say to always run before heating)

Any tips on that?

Reply
Loke-Yeow Wong
20/10/2012 04:29:05 pm

Hi Shannon,

I don't have much experience with Cura. Been using Slic3r, which seem so much friendlier. Turning on the fan is via software (Cura for instance). In Slic3r, there is a tab that shows the various options on managing the fan. Once you sliced up your thing, the resulting gcode will have the command to turn the fan on based on your setting.

Visit the website on Cura or Slic3r for more information.

Regards,
Wong

Reply
William
29/1/2013 08:00:08 pm

Hello, I found your posts about the portabee very informative. It answered a lot of questions I had about the printer except for one. My one question that I still have is how detailed the printed items can be. How good would you say the resolution is for this printer?

Reply
Loke-Yeow Wong
29/1/2013 10:31:59 pm

Hello William,

Thanks for dropping by.

I've not been using it for a while now. It maybe due to my inability to set it up right, I find the print rather crude. For some items, the obvious layers look "artistic". For that kind of price, I can't compare it to the results you can get from Objet, which the cheapest can buy me 2 to 3 Wabeco mill.

For some fun, it is working as it should.

Regards,
Wong

Reply
Loke-Yeow Wong
5/2/2013 11:36:04 pm

Hello William,

For some reasons my reply to your comment wasn't posted.

This low end DIY printer won't give you the smooth surface and nice details you're used to seeing in plastic product. The printout looked crude. For nice details, you may have to look at commercial version like Objet, which lowest end model cost much more.

To me, it was just the fun of having the printer.

Regards,
Wong

Reply

Your comment will be posted after it is approved.


Leave a Reply.

    Enter your email address:

    Delivered by FeedBurner

    Categories

    All
    3d Printer
    Er32 Collet Chuck Proxxon
    Misc
    Misc Projects
    Projects
    Proxxon Pd400
    Sherline / A2Z Monster Mill
    Things I Bought
    Wabeco Mill

    Archives

    June 2018
    January 2017
    December 2016
    August 2015
    July 2015
    June 2014
    May 2014
    December 2013
    November 2013
    October 2013
    June 2013
    March 2013
    February 2013
    November 2012
    October 2012
    September 2012
    August 2012
    July 2012
    June 2012
    May 2012

    RSS Feed

Powered by Create your own unique website with customizable templates.